Overview
Principles
XTag Configurator belongs to the suite XTagManager, a Tag Management System dedicated to Web Analytics (AT Internet and Google Analytics).
It allows managing Web Analytics Configuration, that can be defined as a Web Analytics Tags Container dedicated to one Web Application.
|
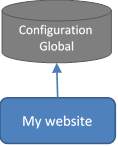
Simple Website: one Configuration |
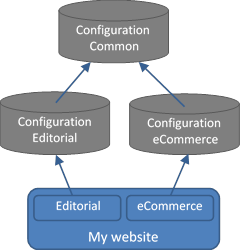
Website made of multiple applications, with common parts (header, footer, menu...) |
|
|
|
Whatever the Configuration(s) design and cascaded inclusions, only one JS is loaded (including ATI SmartTag), with just what the application needs, hence optimal performances.
XTagManager doesn’t provide any server infrastructure, but fully automate publications on your own server or on Amazon cloud servers -that can be setup in a few minutes-, taking care of CDN flush (CloudFront and/or Akamai so far).
For offline consultation, this guide can be downloaded as XTagConfigurator.pdf or as XTagConfigurator.chm (compiled help).
Specificities
As it is basically Web Analytics oriented, XTag Configurator doesn’t work as other generalist TMS do, bringing significant advantages:
|
|
It is a Desktop application (Office based), sharing Configuration assets in the Cloud (Amazon S3, Git). Configuration setup is made locally, hence ultra-fast testing cycles (<15s). |
|
|
It never needs any Data Layer, even for eCommerce, hence no development effort required on application side. |
|
|
It automatically synchronizes AT Internet and Google Analytics, when required (configure once, tag twice), including campaigns in both ways (ATI <> GA). |
|
|
It automatically switches on PreProd storages, depending on customable rules (by default based on declared hostname patterns). |
|
|
It easily tracks dynamic contents (popups, Ajax, Angular, React, Vue...) without development effort on application side, thanks to its customable triggering engine and smart APIs. |
|
|
It automatically tracks YouTube videos (play, pause, progress), even when dynamically loaded, even without the presence of enablejsapi=1. |
|
|
It automatically classifies external/internal visits without boring IP lists, by detecting when they come from internal network or not, even behind a proxy changing its public IP. |
|
|
Its CTAs configuration is not made with tags based on bubbled events, nor by listening Data Layer events, but with an ordered list of Definitions dynamically injected at node level. · Once a node addressed by a Definition, it ignores the others (from specific cases to general ones), · With its built-in contextual variables, unique naming can be ensured with only one Definition, for instant basic Configurations, · Definitions can be factorized thanks to merge capabilities at each level, avoiding copy/paste of common parts, hence an easier maintenance, · It automatically classifies inbound, outbound and download links, based on customable rules. |
|
|
It allows retrieving CTAs and Values Selectors without CSS knowledge, thanks to XTag Selector. |
|
|
It allows checking CTAs name and type in-page, without clicking, thanks to XTag AT Internet Spy or XTag Google Analytics Spy. |
|
|
It allows displaying CTAs results Charts in-page, thanks to XTag AT Internet Charts. |
|
|
It allows performing instant CTAs non-regression checking, thanks to XTag AT Internet CTAs List or XTag Google Analytics CTAs List. |
|
|
Its JavaScript API allows customizing all default behaviors, so that you’re never blocked by any technology (except AMP), nor any tracking requirement. |
|
|
It allows embedding any other TMS for marketing tags: Google Tag Manager and Tag Commander as built-in settings with automated preprod switching, and others (Tealium, Ensighten, Adobe,... ) thanks to its “Third-Party” container. Doing so, it allows designing different containers schemes and release cycles for Web Analytics and Marketing activities. |
|
|
It manages GDPR opt-out (ATI privacy mode and GA blocking) whatever the system providing user cookie acceptance (Tag Commander Trust provided as ready-to-use example). |
|
|
Its snippet can be synchronous, asynchronous or deferred, synchronous mode allowing header third-parties like Optimizely. |
|
XTagManager allows implementing Web Analytics very much faster than any other TMS, for a richer and more accurate tracking, with no dependencies on development team, so with a run mode fully agile. |
Prerequisites
Mandatory
· Windows 2008 and further.
· Office 2010 and further.
· For Publication: Amazon S3 bucket, or public server with FTP access. See Server Setup for preparation.
· Recommended: Chrome extensions XTag AT Internet, XTag Google Analytics, XTag Selector.

Optional
· For Configurations history saving & sharing (team work): Git installation.
· For Simulation and Tests: Chrome extensions Requestly or Resource override.
Install XTag Configurator
1. Close all your Excel workbooks,
2. Run Setup_XTC.exe, click on Next ,
3. You are prompted to enter the root location, C:\XTagConfigurator by
default.
Provided path is created when doesn’t exist, and
automatically declared as trusted location in Office.
4. Click on Next until installation’s end.
5. Double click on the
XTag Configurator icon
created on your desktop, the splash screen appears:

6. Start working with XTag Configurator:

Basic Settings
Sharing
Mandatory for team work, optional otherwise: you need to populate Sharing Path/URL and Git settings in Common User Options.
Sites List
Optional: if already populated and shared, the Sites List of your organization will be available. Otherwise, it can be initiated by importing a CSV file.
But you can also do it one by one, as and when your Configurations are created.
Configurations List
Optional: if already populated and shared, the Configuration List of your organization will be available, and the first time you will open one, a Git Clone will be automatically done.
Otherwise, the list will appear empty and you’ll have no other choice than creating a New one.
Publication settings
Mandatory for Publication, optional for local testing: see Publisher Options.
Configuration Template
Optional but recommended: customize the template used to create each Configuration, see Configuration Template.
My First Configuration
Creation
Create your first operational configuration in a couple of minutes:
1. Run XTag Configurator.
2. Create a Configuration: see New for instructions.
3. Click on OK
4. The new Configuration is created and open:

Completion
1. Adjust/complete the Host Name Pattern with the domain of your Website:

2. If they were not present
in your template, click on Platforms ribbon to define ATI
Site IDs and possibly GA Properties.
If ATI Site ID appears as “Undeclared Site ID”, declare it by
clicking on Sites List,
then on New.

3. That’s it! You can
already check this basic Configuration by clicking on Update Preview.
It is ready to be published and installation tips can be
forwarded to your technical team.
In the meantime, you can start testing without waiting thanks to
the Simulation mode, so
that it can be completed before installation with further
steps:
4. If you need to setup ATI Level 2 and possibly Google Analytics Content Groups, activate Perimeters Scope,
5. Click on Analysis ribbon to activate and
define the data categories you want to collect, and possibly define
Production and
Perimeters Scope
Maps to address your Website structure:

6. If you want completing
your Configuration with a GTM or a Tag Commander Container, click
on Container ribbon and define them:

Preparation
1. In the Preview Section, click on Preview Server (if not already highlighted by a previous test).
![]()

2. Click on Update Preview. A confirmation is displayed:

![]()
3. Click on Copy Preview URL

![]()
Requestly for Simulation
1. In Chrome browser, click
on Requestly extension ![]() .
.
2. Click on + New Rule
3. Click on Insert Scripts

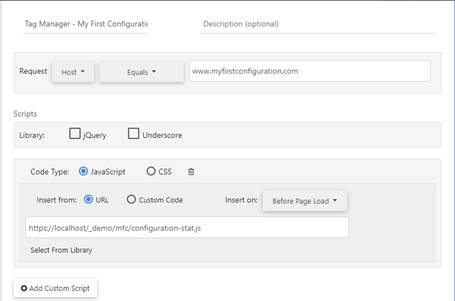
4. Enter a name, and set the
filter on Host Equals, then type website hostname (usually the same
than Host Name
Pattern, when exact match),
Click on + Add Custom Script ,
change Insert on: option to
Before Page Load
Paste what you get in the clipboard from last Preparation step (click on
Copy Preview URL) in
source URL (relative or
absolute)
You should obtain something like
that :
5. Click on Save : your Simulation is ready!
Verification
1. Run XTag AT Internet and open a tab to display your website (or reload it Ctrl + F5 )
2. You should record a Page tag in XTag AT Internet. If no, wait a few seconds and reload your page (Requestly sometimes requires a delay just after rule creation).
3. Navigate to another page: you should see a new Page tag.
If no, maybe your Web Application is
a Single Page Apps, or maybe it is refreshed by Ajax calls without
Page Load.
If you see #/ or
#!/ in landing URL, it is
a SPA, knowing there are cases where such indices are not
present.
You can type simultaneously Ctrl + U
to see the page source: if there’s no
HTML content but only JS inclusions, it’s a SPA (but Ajax refresh
cannot be identified this way).
If you have identified such technology or if you have a doubt:
activate On Changed in Analysis ribbon, click on Update Preview and reload your site page.
>> Try a new
navigation: now Page tags must be sent each time you
navigate.
|
- Activating On Changed on non-SPA is not an issue, but it is not optimal, and can make some configuration stuffs more complex than required. Moreover, that modifies installation tips then it’s preferable to be sure: it’s better asking your technical team. - In some rare cases, Requestly’s Script Injection happens too late. In this case you must activate the Simulation mode in the Generate section of Configuration ribbon. |
Publication
Prerequisites
Once your Configuration validated by Simulation, you can Publish it. See Publisher Options.
Publish & Commit
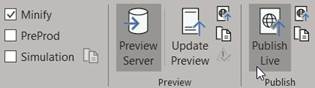
Ensure Minify is checked, with PreProd and Simulation unchecked (if not, you’ll be warned), then see instructions for Publish Live.
Installation
Once your new Configuration published, you can
ask your technical team to install its snippet. See Installation Tips.
In the meantime, you can continue working on it.
Completion & Test
1. Make your change
2. Click on Update Preview
3. Reload Page
4. Look at Page tag in Page tag in XTag AT Internet, and use XTag AT Internet Spy to check your CTA names and types without clicking.
This cycle being very fast, you can setup and test your tags one by one, and make a summary test in the end.
Preparation
Before modifying your Configuration, it’s preferable activating the PreProd mode: doing so, all your tests won’t pollute production results.
If you intend to add/modify Customization JS, you can also uncheck Minify: your code will be easier to debug.
Requestly for Modification
1. Open the Configuration you want to modify.
2. In Chrome browser, click
on Requestly extension ![]() .
.
3. Click on + New Rule
4. Click on Redirect Request

5. Enter a name,
6. Switch on XTag Configurator, click on Copy Live URL, then paste in Url Contains
7. Switch on XTag Configurator, click on Copy Preview URL, then paste
in Destination Url
You should
obtain something like that :
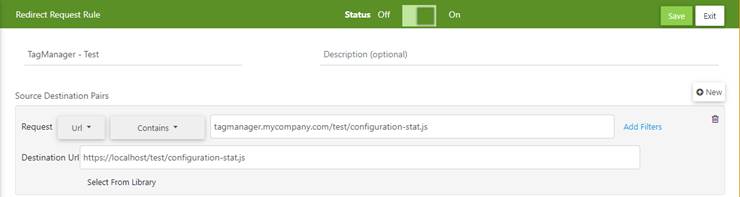
8. Click on Save : you’re ready to work on it!
Modify & Test
1. Make your change
2. Click on Update Preview
3. Reload Page
4. Look at Page tag in Page tag in XTag AT Internet, and use XTag AT Internet Spy to check your CTA names and types without clicking.